
If you’re craving a festive treat that brings Halloween spirit right to your kitchen, look no further than this Spooky Halloween Brownies with Mummy, Spider Web, and Ghost Decorations Recipe. These rich, fudgy brownies are not only delicious but also magically transformed into creepy-cute creatures and eerie spider webs using simple white chocolate and candy eyeballs. Perfect for parties, trick-or-treaters, or just treating yourself, these brownies combine classic chocolatey goodness with playful Halloween artistry that’s sure to impress and delight everyone.
Ingredients You'll Need
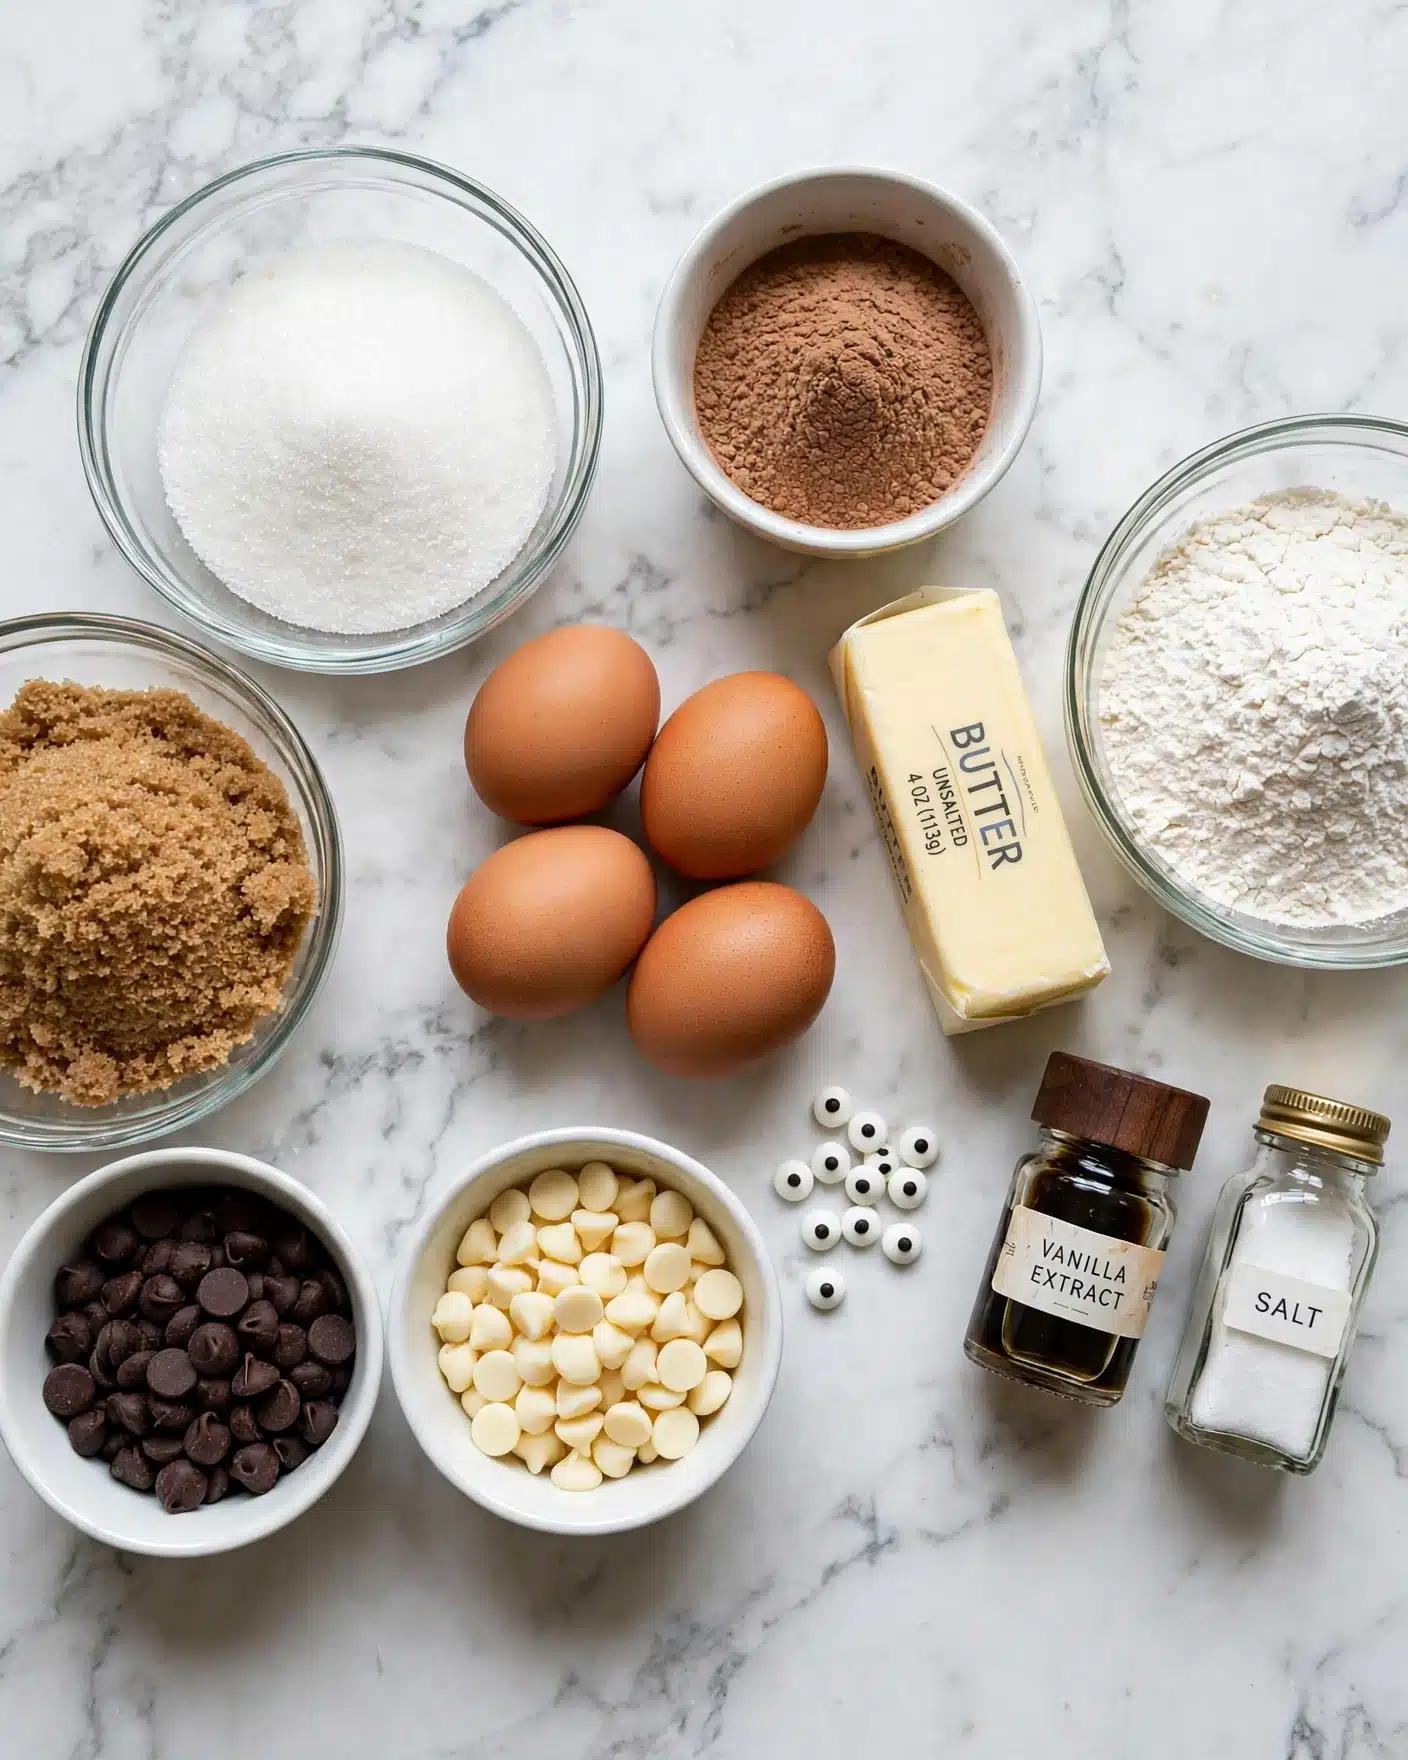
Getting the ingredients right is the first step to nailing this Spooky Halloween Brownies with Mummy, Spider Web, and Ghost Decorations Recipe. Each component plays a vital role in creating that perfect balance of fudgy texture, deep chocolate flavor, and a fun canvas for decoration.
- 1 cup unsalted butter, melted: Provides rich moisture and a silky crumb for the brownies.
- 2 Tablespoons vegetable oil: Adds extra moistness and keeps the brownies tender.
- 2 cups white granulated sugar: Sweetens and helps create that crackly shiny top we all love.
- ½ cup light brown sugar: Brings subtle caramel notes and chewiness to the texture.
- 4 large eggs: Bind everything together while adding richness and lift.
- 4 teaspoons vanilla extract: Enhances all flavors with a warm, inviting aroma.
- 1 cup all-purpose flour: Gives structure without weighing down the brownies.
- 1 cup unsweetened cocoa powder: Intense chocolate punch that’s the star of the show.
- 1 teaspoon salt: Balances sweetness and amplifies the chocolate flavor.
- 1 cup semisweet chocolate chips: Melts into gooey pockets for that little surprise in every bite.
- 10 ounces white melting wafers: Essential for piping our spooky mummy wraps, spider webs, and ghost shapes.
- Candy eyeballs: The perfect creepy detail to bring your Halloween treats to life.
How to Make Spooky Halloween Brownies with Mummy, Spider Web, and Ghost Decorations Recipe
Step 1: Prepare Your Pan and Oven
Start by preheating your oven to 350°F. Line a 9x13-inch baking pan with parchment paper, making sure to leave enough overhang on the edges. Lightly spray the parchment with cooking spray so the brownies will lift out easily once baked, making decorating a breeze.
Step 2: Whisk Together the Wet Ingredients
In a large mixing bowl, combine the melted butter, vegetable oil, white sugar, and brown sugar. Whisk these until smooth and glossy. Then, add the eggs and vanilla extract, whisking for about a minute until everything is fully blended and slightly fluffy—this ensures your brownies will have the perfect texture.
Step 3: Incorporate Dry Ingredients
Add the all-purpose flour, cocoa powder, and salt to your wet mixture. Stir gently and just until everything is barely combined. Overmixing can make brownies tough, so keep that hand light! Finally, stir in the semisweet chocolate chips for those irresistible melty bites.
Step 4: Bake to Chocolate Perfection
Pour the batter into your prepared pan and smooth the surface evenly. Bake for 25 to 30 minutes, or until a toothpick inserted in the center comes out clean with just a few moist crumbs. Be careful not to overbake — you want fudgy, not dry brownies!
Step 5: Cool and Cut
Allow the brownies to cool completely, using the parchment overhang to lift them from the pan. Cool them on a wire rack so they set firmly before cutting. For your decorations, cut square pieces for spider webs and rectangular pieces for mummies and ghosts.
Step 6: Melt White Chocolate for Decorating
Place your white melting wafers in a microwave-safe bowl and heat in 15 to 20 second intervals at low power. Stir after each interval until smooth and glossy. This silky chocolate is the secret to creating the spooky designs that bring our brownies to life.
Step 7: Make Mummy Brownies
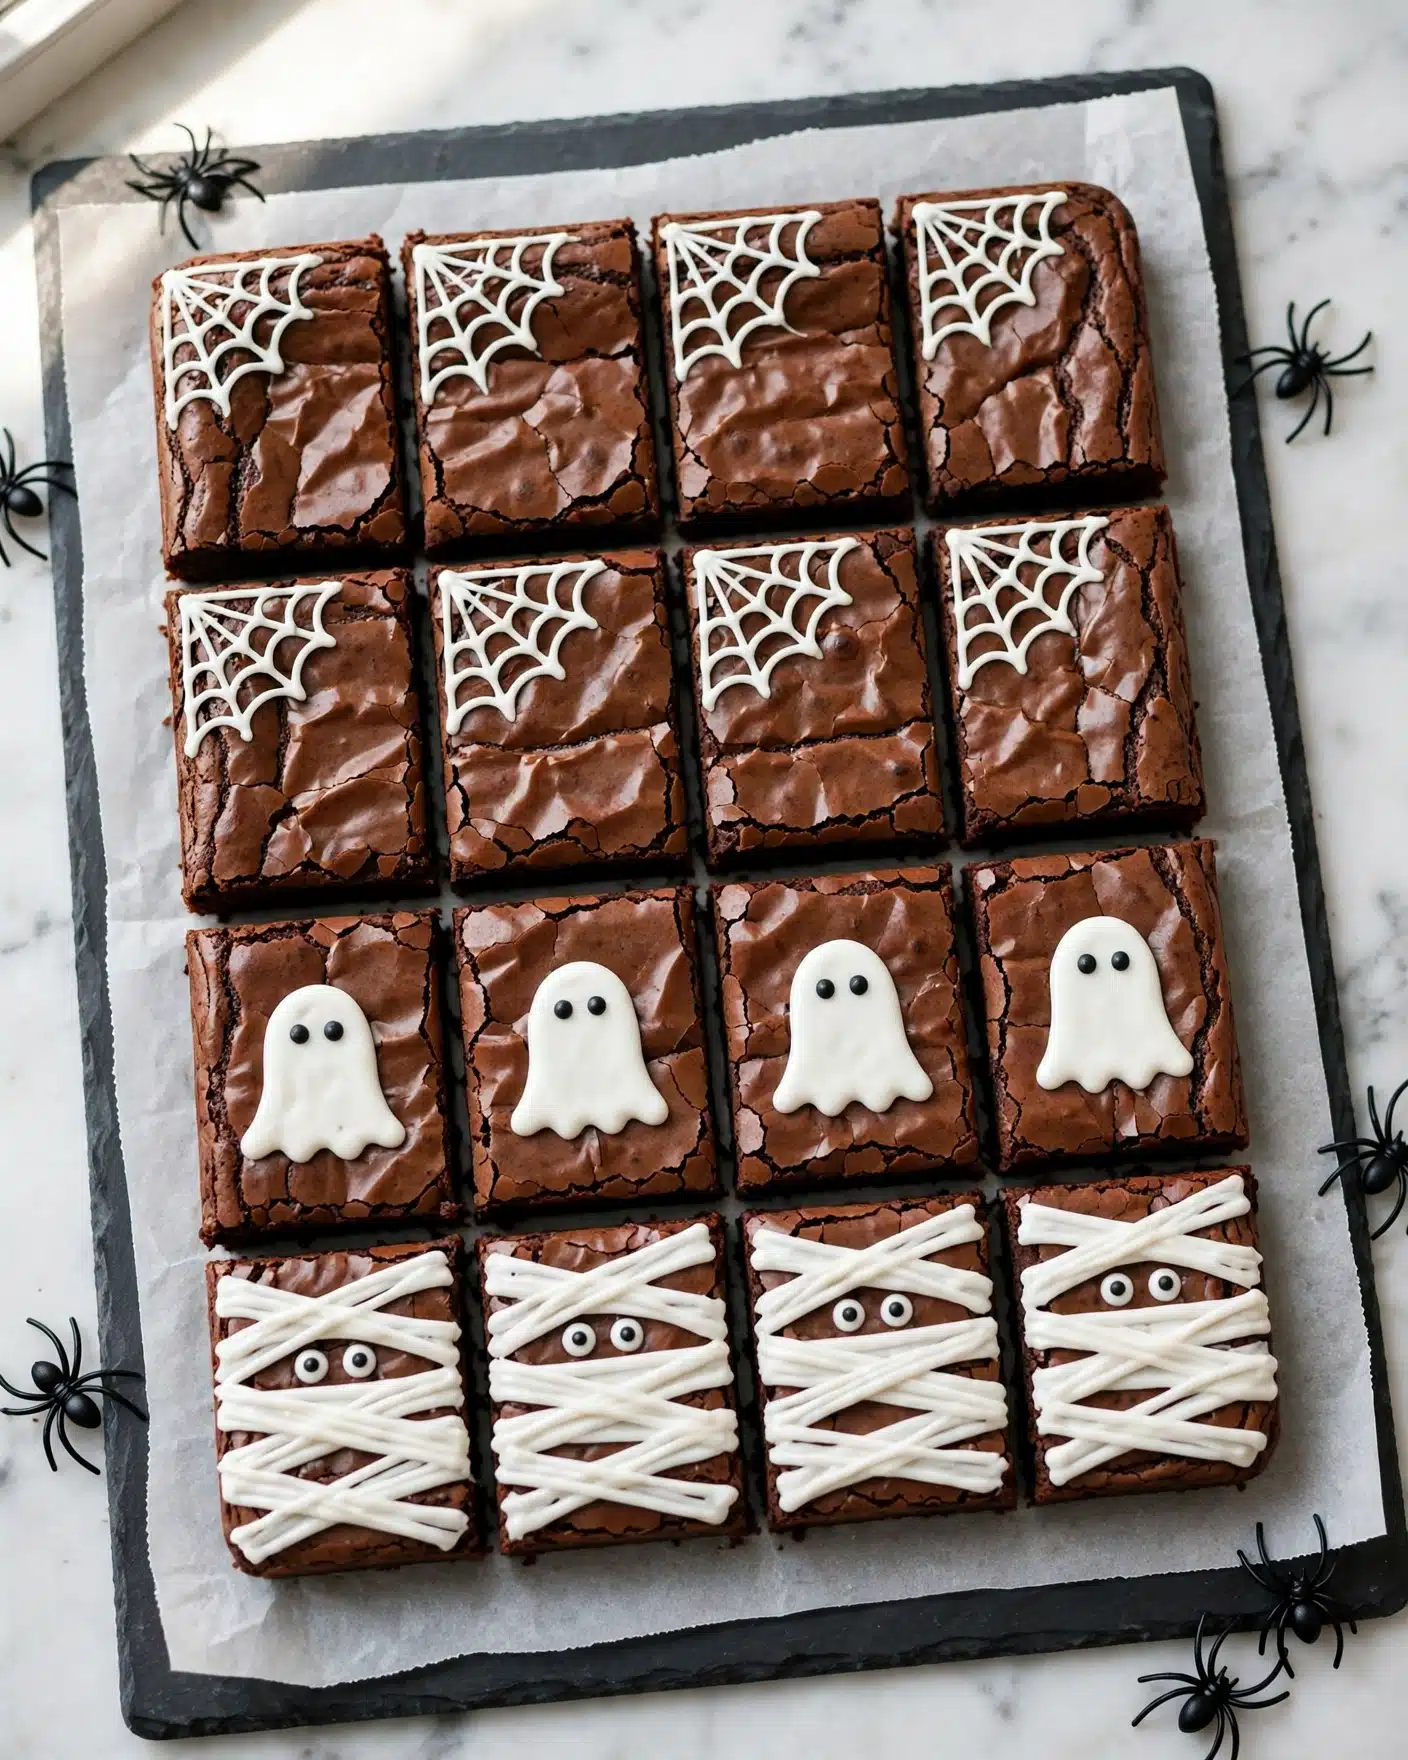
Pour the melted white chocolate into a zip-top bag, snip a tiny corner, and pipe thin ribbons back and forth over the rectangular brownies to mimic mummy wraps. While the chocolate is still wet, press on candy eyeballs to complete the eerie effect before the white chocolate sets.
Step 8: Create Spider Web Brownies
For the square brownies, pipe long straight lines of white chocolate from corner to corner, then fill in with connecting curved lines to mimic a web. Take your time! The contrast between the dark brownie and delicate white web is a total showstopper.
Step 9: Craft Ghost Brownies
Drop small dime-sized circles of white chocolate onto the rectangular brownies. Using the back of a rounded spoon handle, gently drag the middle of the circle downward to create ghostly “tails.” Add candy eyeballs before the chocolate hardens to give your ghost that spooky personality.
How to Serve Spooky Halloween Brownies with Mummy, Spider Web, and Ghost Decorations Recipe
Garnishes
For an extra pop, dust your finished brownies with a light sprinkle of edible glitter or orange and black sugar crystals. A few additional candy eyeballs on the serving platter also add playful flair that guests will love. These fun details help bring the Halloween theme to the next level.
Side Dishes
Pair these brownies with a cool glass of milk or a steaming cup of pumpkin spice latte for the ultimate cozy treat. Fresh berries or a simple scoop of vanilla ice cream balance the decadence of the brownies and add another textural element that makes your spooky dessert spread complete.
Creative Ways to Present
Arrange your mummy, spider web, and ghost brownies on a tiered cake stand or vintage Halloween-themed platters. Adding little Halloween figurines or a few fall leaves around the plate creates a festive centerpiece that’s guaranteed to be the highlight of your party table.
Make Ahead and Storage
Storing Leftovers
Keep leftovers fresh by storing the brownies in an airtight container at room temperature for up to 3 days. For best texture, place a sheet of parchment paper between layers if stacking to avoid smudging your spooky decorations.
Freezing
You can freeze undecorated brownies wrapped tightly in plastic wrap and then foil for up to 3 months. Thaw completely before decorating so your decorations will stick perfectly and look their best.
Reheating
If you want to warm the brownies, microwave a single piece for about 10 to 15 seconds. This makes them gooier and enhances that freshly baked feeling without melting the white chocolate decorations.
FAQs
Can I use regular chocolate instead of melting wafers for decorating?
While regular white chocolate can work, melting wafers are designed to melt smoothly and set firmly without seizing, making them easier to pipe and perfect for decorations that hold their shape well.
How do I prevent the brownies from overbaking?
Keep a close eye during the last five minutes of baking and insert a toothpick to check doneness. The toothpick should come out with a few moist crumbs, not wet batter, ensuring fudgy brownies that aren’t dry.
Can I make these brownies gluten-free?
Yes! Substitute the all-purpose flour with a 1-to-1 gluten-free baking flour blend. Make sure your cocoa powder and chocolate chips don’t contain gluten or cross-contaminants for a safe, tasty treat.
What if I don’t have candy eyeballs? What can I use instead?
If you don’t have candy eyeballs, small dots of melted chocolate or tiny sugar pearls can work well. You can also draw eyes with an edible marker on white chocolate once it’s set.
Can I store these brownies in the fridge?
Storing brownies in the fridge can make them a bit dry or hard. If you refrigerate, bring them to room temperature or warm slightly before serving to restore softness and flavor.
Final Thoughts
There’s really nothing better than mixing baking with a bit of Halloween magic, and this Spooky Halloween Brownies with Mummy, Spider Web, and Ghost Decorations Recipe does exactly that! Whether you’re baking with kids or whipping up a festive treat for friends, these brownies are sure to bring smiles, spookiness, and that incredible chocolate craving satisfaction we all need this season. Give them a try — I promise you won’t regret it!
```
PrintSpooky Halloween Brownies with Mummy, Spider Web, and Ghost Decorations Recipe
These spooky brownies are perfect for Halloween, combining rich, fudgy chocolate brownies with festive decorations including mummy, spider web, and ghost designs made from melted white chocolate and candy eyeballs. A fun and delicious treat to impress guests and kids alike.
- Prep Time: 15 minutes
- Cook Time: 30 minutes
- Total Time: 1 hour 15 minutes
- Yield: 24 servings
- Category: Dessert
- Method: Baking
- Cuisine: American
Ingredients
Brownies
- 1 cup unsalted butter, melted
- 2 Tablespoons vegetable oil
- 2 cups white granulated sugar
- ½ cup light brown sugar
- 4 large eggs
- 4 teaspoons vanilla extract
- 1 cup all-purpose flour
- 1 cup unsweetened cocoa powder
- 1 teaspoon salt
- 1 cup semisweet chocolate chips
Decorations
- 10 ounces white melting wafers
- Candy eyeballs
Instructions
- Prepare: Preheat your oven to 350°F (175°C). Line a 9x13 inch baking pan with parchment paper, making sure there’s enough overhang on the sides to easily lift out the brownies after baking. Lightly spray the parchment with cooking spray.
- Whisk the wet ingredients: In a large mixing bowl, whisk together the melted butter, vegetable oil, white granulated sugar, and brown sugar until combined and smooth. Then add the eggs and vanilla extract, and whisk vigorously for about one minute until the mixture is light and slightly frothy.
- Add the dry ingredients: Sift in the all-purpose flour, cocoa powder, and salt. Gently fold these into the wet mixture, stirring just until barely combined. Avoid overmixing to keep the brownies tender.
- Stir in chocolate chips: Fold in the semisweet chocolate chips carefully until evenly distributed throughout the batter.
- Bake: Pour the batter evenly into the prepared pan. Bake for 25 to 30 minutes, or until a toothpick inserted in the center comes out clean or with just a few moist crumbs. Take care not to overbake to ensure fudgy brownies.
- Cool: Let the brownies cool for about 30 minutes in the pan. Then lift them out using the parchment paper edges and transfer to a wire rack to cool completely before decorating.
- Melt white chocolate: Place white melting wafers in a microwave-safe bowl. Microwave on low power in 15 to 20 second intervals, stirring well after each interval, until smooth and fully melted.
- Decorate Mummy Brownies: Pour melted white chocolate into a zip-top bag and snip off a small corner. Pipe horizontal ribbons of chocolate back and forth over rectangular brownie pieces to mimic mummy bandages. Add candy eyeballs on top before the chocolate sets.
- Decorate Spider Web Brownies: Use a similar piping method on square brownie pieces: pipe long lines radiating from corners, then connect these lines with curves to form spider web shapes using the melted white chocolate.
- Decorate Ghost Brownies: Spoon small dime-sized circles of melted white chocolate onto brownie pieces. Use the back of a rounded spoon handle to smear the center downward, creating a ghostly shape. Place candy eyeballs before the chocolate hardens.
- Cut and serve: For spider web brownies, slice into squares; for mummy and ghost brownies, cut into rectangles. Enjoy these festive, spooky treats at your Halloween party or any fun occasion!
Notes
- Do not overmix the batter to keep brownies tender and fudgy.
- Keep an eye while baking; overbaking can dry out the brownies.
- The melted white chocolate can be gently reheated if it begins to harden before decorating.
- Use parchment paper with overhang to easily lift out brownies for cooling and cutting.
- Customize decorations with other Halloween-themed candies or colored melting wafers for variety.

Leave a Reply